Dead Sled Wrenchers New England
Tech


Rebuild a Tillotson HR Carb

So You've got an old Ski-Doo or Arctic Cat or other sled that uses a Tillotson carb and either the sled doesn't run at all or its running poorly, and you think the carb is at fault.
First lets look at some of the symptoms of carb problems.
1. Sparkplug is not wet, and doesn't smell like gas

2. Sparkplug is soaked with gas but does have spark
If theres no spark start there and come back to the carb once you've gotten that problem fixed.

3. Gas runs out of the carb

There are 2 standard failure modes for a Tillotson HR, on a Ski-Doo single cylinder. Since single cylinder Ski-Doos is what I know thats what I'll talk about. I expect others are similar. Probably most common is no gas, generally caused by a stuck needle, a close second is gas running out of the carb which can be caused by a stuck needle or more likely a bulged welch plug under the idle jet.

So the first step is to pull the carb to start pull the fuel line(s) some carbs have a fuel return line, some don't. Some people put pipe clamps on the fuel lines, I've used them but I don't think its that important, especially if you're using blue fuel line which is much more stiff than the clear. Then remove the throttle cable. I like to tin the end of a new throttle cable with my soldering iron before I put the cable on the sled. Tinning the cable keeps the end from fraying and makes it much easier to put back on the carb. Some cables will have a metal piece crimped over the end to do the same thing. If the metal piece stays on then its great, if it falls off you were better off tinning it in the first place.

Now remove the carb from the sled use your carb removal wrench, (see sidebar). The nuts shouldn't be too tight, but if you have trouble stop, apply some penetrant (see sidebar), wait and try again. Be careful not to break a stud as it'd be a real pain to replace.

Once the Carb has been removed from the sled unscrew the fuel strainer if you have one from the bottom of the carb and use your screwdriver (see sidebar) to remove the screws from the bottom of the fuel pump segment.

Some carbs, particularly HL models have just a plate on the bottom so the fuel line can come in at a 90 degree angle to the carb. I prefer the strainer.


List of tools:

1. Carb removal wrench:
This is either a crows foot wrench, a normal wrench with the handle cut off, or a wrench with the head turned 90 degrees. Ski Doo single cylinder engines with HR carbs need a 12mm wrench. My wankle Panther uses the same, my old Panther P22J had an HD carb and 17mm nuts.
My favorite carb wrench came from a Ski-Doo tool kit. Its 12mm head is bent 90degrees. It came in the toolbox of my '72 Oly 335 and works really well. Second best is the 12mm wrench I cut off, I then grooved it so I could push on it with a flatblade screwdriver.

2. Penetrant:
Penetrating oil is one of the most important tools in the toolbox. Stuck fasteners are common on old sleds and need to be removed gently. I like PB Blaster because its available at most autoparts stores. WD-40 is a LOUSY penetrant, WD means "Water Displacing" which is what its for, not for being a penetrant...

3. Flat head screwdriver:
I like to use a 4in1 screwdriver, the small flathead takes the fuel pump segment off the carb, the large flat pulls the highspeed jet.

4. Cleaning Bowl:
This is a bowl to clean the carb in. I use a small stainless steel mixing bowl. Its important to use a metal or chemical proof plastic bowl because the cleaning chemicals can eat cheaper plastic bowls.

5. Metric deep 1/4" drive sockets. On an HL carb you may have to grind the walls of the socket thinner. Once you've ground it clean it up with some fine sandpaper so it doesn't bind.

6. Couple sheets of white paper

7. 1/8" drill bit and drill

8. Small punch or small nail.

9. Nail the same size as the welch plugs:
Carefully polish the head of the nail until its smooth. Cut the point off the nail.

10. Cleaning solution:
Carb cleaner or whatever. I use PB Blaster, it works great and isn't particularly flamable or hard on my skin.

11. Carb cleaner:
Cheapstuff, from the dollar store.

12. Rubber gloves:
Carb cleaner is hard on the hands.

13. Rebuild kit:
Kimpex is fair except the new control arms aren't very good.
Winderosa kits are excellent and often a little cheaper.

14. Ballpeen hammer:
A little one.

15. Replacement fuel strainer

16. Replacement fuel filter

17. New fuel line

18. Fuel pickup strainer

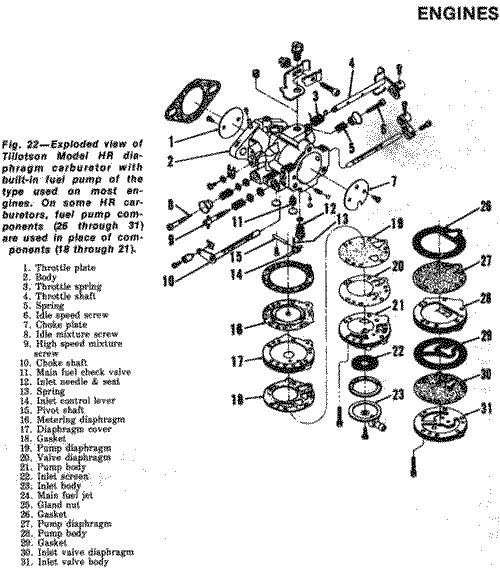
Be careful as you remove the bottom of the carb, try to keep all the pieces together. On a Ski-Doo single cylinder, like the type 300's HR37a there are 2 metal pieces and 4-6 gaskets in the fuel pump segment (see diagram, parts 26-31).
Separate the gaskets and set them aside in order on a piece of paper, mark the paper with what order the gaskets go in. Set the metal pieces in the cleaning bowl(see sidebar) for later.

Now look into the area that the fuel pump used to cover. You should be able to identify the inlet needle, and its control arm. You should also be able to find the 2 welch plugs (only one welch plug on an HL). If your carb was dripping gas before probably one or more of the welch plugs will be deformed.
Use your screwdriver to remove the screw that holds the pivot rod for the inlet need control arm. Hold your finger over the control arm while you do this, theres a spring underneith, don't lose it. Carefully lift the inlet needle control arm, and its pivot rod out of the way. Then get the needle and spring. Use your socket (see sidebar) to remove the brass needle seat that the inlet needle sat in, put it in the cleaning bowl.
Use the 1/8" drill bit and drill to CAREFULLY drill through the center of the welch plugs until you've just barely passed through the plug. Then use the punch or small nail to carefully pry the welch plug out. When you remove the plugs you'll find one has a little brass thing under it, thats the highspeed jet, the other hole will be empty but have a small hole in the bottom, thats the low speed jet. Use your larger screwdriver blade to remove the highspeed jet and put it in the cleaning bowl.

Now unscrew both of the mixture screws from the side of the carb (#18 and 19 in the diagram). You may have to use the punch or nail to remove the two little o rings that the screws pushed against. Match the o ring to the screw and the correct spring. There may be washers on the screws also. Set them all aside.

So now your carb is completely stripped. Put the carb body in your cleaning bowl and douse it with your cleaning solution. Make sure everything is completely coated and mix it around some. Leave it alone for awhile. Then come back and scrub it good with a toothbrush or something like that. Rinse with carb cleaner. Use the carb cleaner to blow out all the passages in the carb. I do this outside so I don't suffocate from the cleaner. Wear your rubber gloves carb cleaner is very bad for you.

Now dry everything carefully try to get as much crud off the carb body as possible. Pay careful attention to the 2 metal pieces from the fuel pump they need to be perfectly clean and smooth. Any corrotion in these parts will mean trouble. I don't know if you could fill pits with JB Weld or something similar, but it might be worth a try.

Once everythings clean put the seat back with your socket, then use the screwdriver to put the highspeed jet back in. Set one of the new replacement welch plugs from your rebuild kit into the welch plug inset. Set the nail with its smooth head right on the welch plug. Use the ballpeen hammer to tap the welch plug flat. You might have to work around the welch plug but get it just flat, don't dent it in.
Dig through your kit and find the new needle and control arm. The control arm should have a split end that the needle sits into. This is a big improvement over the old method and helps to keep the needle from sticking. The kit will have a selection of new springs, but I usually use the existing one if it looks good. Use the old pivot too, lube it with just a little PB Blaster or other light oil. Set everything together like it was and put the screw back in.

 
Get your new mixture screws out and figure out which spring goes where and which gets what o ring. Springs go on first, then the washer if there is one, then the o ring, then screw that all into the carb.
Now match up the gaskets from your kit to the ones you removed from your carb. Put them all back into the carb the way you took the other ones out. They'll only fit one way as long as you've got them right side up. The metal pieces also only fit one way. Once all the gaskets and metal pieces are in there put the screws back in, make sure they're all reasonably tight but not super tight. Screw on a new fuel strainer, remount the carb with the replacement block gaskets.
  A note on gasket goop:
I never use any gasket goop in a carb, if somethings warped badly enough that it won't fit tight without some gasket goop the carb is too badly beat to be rebuilt, replace it. Used carbs can be found on the web pretty easily.

Most HR carbs are mounted with a spacer block that the vacuum which actuates the fuel pump flows through. Make sure the small hole in the spacer block isn't obscured and is lined up with the little hole in the cylinder. Make sure the holes in the gaskets here fit right too. You can get away with using the old gaskets but your kit came with new ones so use 'em.

Some carbs have a vacuum line that runs from somewhere on the engine to the carb, replace this with a new piece of line, its usually normal 1/4" fuel line.

This is a good time to replace your fuel lines if the old ones are at all questionable. Its also a good time to put on a primer.

Put in your replacement fuel filter unless you've recently put in a new one. Replace the tank strainer now if yours was cruddy.

A freshly rebuilt carb on an engine that doesn't have a primer is going to be an absolute bear to start because its going to have to pull gas from the tank all the way to the carb. Arctic Cat sleds with the tank in the back are real rough for this. Pour some premix down the sparkplug hole if you can to help yourself out. A primer makes this not such a big deal.


Back